I. Introduction
Since a laptop keyboard is one of the areas of a computer that is touched the most, dust, crumbs, body oils, and even bacteria are drawn to it. This accumulation can eventually lead to stuck keys, less comfortable typing, and even issues with your device’s overall performance. You can safely deep clean your laptop keyboard without removing a single key, despite the fact that many people avoid doing so out of concern that it will harm the components.
Anyone who wants to update their keyboard properly with easy-to-use tools and cautious techniques should follow this guide. Whether you work remotely, are a student, or simply eat while typing, your keyboard probably needs some maintenance. The finest aspect? You don’t have to purchase pricey equipment or be tech-savvy. With the correct method and a few commonplace items, you can get your keyboard back to almost like-new condition.
You’ll learn in the next sections when a deep clean is necessary, what materials you’ll need, and how to do it step-by-step without causing any damage. For a more hygienic, seamless, and clean typing experience, it’s much easier than you might imagine and well worth the effort.
II. When Should You Deep Clean Your Laptop Keyboard?
The performance and hygiene of your laptop can be enhanced and long-term damage can be avoided by knowing when to deep clean the keyboard. Deep cleaning, in contrast to a fast surface wipe, entails reaching into the gaps between keys to get rid of dust, debris, and oils that are impossible to get to with ordinary cleaning.
The following are some obvious indicators that a thorough cleaning is needed:
Sticky or Unresponsive Keys: Debris accumulation beneath your keys is probably the cause if they feel gummy or don’t press down correctly.
Visible Dust or Dirt: A thorough cleaning is necessary if you see pet hair, crumbs, or a layer of dust under or between the keys.
Regularly Eating Near Your Laptop: Grease and food particles can easily enter the keyboard and cause long-term issues.
Frequent Use in Public or Shared Spaces: Hygiene-based cleaning is crucial because shared devices gather more oils and germs.
After Illness: Recontamination can be avoided and others who might use your device can be protected by cleaning your keyboard after an illness.
It’s a good idea to deep clean every two to three months. However, if your usage is heavy or your environment is dusty, you might want to do it more often.
III. Tools and Supplies You’ll Need
You’ll need a few basic tools, the majority of which are readily available and reasonably priced, to thoroughly clean your laptop keyboard without taking the keys out. Dust, grime, and germs can be safely removed with these tools without causing harm to delicate parts.
What you’ll need is as follows:
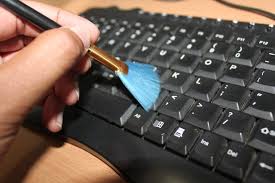
A makeup brush or soft-bristle brush is ideal for delicately removing grime from in between keys.
Compressed Air Can: Eliminates crumbs and dust that are concealed beneath the keycaps.
Microfiber Cloth: Perfect for cleaning surfaces without leaving scratches, this cloth is lint-free.
70% or more isopropyl alcohol: Safely and residue-free disinfectant.
Cotton Swabs: Assists in focusing on corners and small spaces.
Optional Keyboard Cleaning Gel or Putty: Removes tiny particles that brushes and air may overlook.
Steer clear of bleach, household cleaners, and excessive liquid as these can result in irreversible harm. Before beginning the cleaning procedure, always turn off your laptop and unplug it. Having the proper equipment guarantees a complete, safe cleaning that keeps your keyboard functioning and looking brand new.
IV. Preparation Before Cleaning
Making the right preparations before beginning the cleaning process is essential to preventing unintentional damage to your laptop. First and foremost, unplug your laptop from all power sources and fully shut it down. To reduce the chance of electric shock or short circuits, remove the battery from your device as well, if it is detachable.
After that, tidy up your workspace to prevent spills and to make space for your tools. Select a spotless, level area with adequate lighting. In order to avoid getting oils or dirt on the keyboard while using it, it’s also a good idea to wash your hands.
Assemble all of your cleaning materials in one location to avoid disruptions once you get started. Read the directions for safe use if you’re using a compressed air can. Additionally, keep your cleaning supplies slightly damp, never wet, and refrain from soaking any cloths or using harsh chemicals.
This brief setup time guarantees a thorough cleaning that is efficient, secure, and safe.
V. Step-by-Step Cleaning Process
Care and accuracy are needed to thoroughly clean your laptop keyboard without taking the keys out. Here is a thorough, step-by-step guide to make sure you do it successfully and safely:
First, turn off and unplug the laptop safely. Make sure the gadget is unplugged and turned off. Take the battery out if you can.
Turn the laptop upside down.
To get rid of any loose crumbs or debris, gently flip it over and give it a little shake.
Make Use of Compressed Air
Spray brief bursts between keys while holding the can at an angle. In difficult-to-reach places, this eliminates dust and grime.
Between-Keys Brush
To remove tough debris, use a soft-bristled brush, such as an anti-static keyboard brush or a clean makeup brush.
Clean the Surface
Use 70% or more isopropyl alcohol to lightly moisten a microfiber cloth. Wipe the keys and the area around them gently.
Detailing with Q-tip
Clean the edges of each key with a cotton swab that has been slightly moistened for greater accuracy.
Let it sit and dry.
Before turning the keyboard back on, let it air dry for ten to fifteen minutes.
By following these procedures, you can keep your keyboard clean without running the risk of damaging it by removing keys.
VI. Common Mistakes to Avoid
Many users make simple mistakes that result in unintentional damage when deep cleaning their laptop keyboards. By avoiding these typical mistakes, you can extend the life of your device and guarantee risk-free, efficient cleaning.
Using Too Much Liquid
Using too much water or cleaning solution is one of the most common errors. The internal circuitry can be harmed by even a tiny amount of moisture seeping beneath the keys.
Directly Misting the Keyboard
Cleaning solutions should never be sprayed directly onto the keyboard, but rather onto a cloth. Liquid penetration is more likely when spraying directly.
Employing Dangerous Substances
Steer clear of ammonia-based solutions, window cleaners, and bleach. These have the potential to erode the important labels and harm plastic parts.
Ignoring the Power-Off Step
Unintentional keystrokes or short circuits may result from cleaning while the laptop is powered on or plugged in.
Taking the Keys Out Hardly
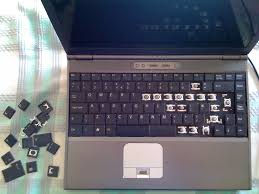
Unless your model allows it, never pry off keys. The mechanisms of many contemporary laptop keyboards are brittle and prone to breaking.
Disregarding Routine Maintenance
Grease accumulates when cleaning intervals are too long, making cleaning more difficult and possibly compromising essential functionality.
You can prolong the useful life of your laptop and protect it by avoiding these mistakes.
VII. How Often Should You Deep Clean?
Your surroundings, usage patterns, and personal hygiene standards all influence how often you should deep clean your laptop keyboard. Generally speaking, most users should thoroughly clean their laptop keyboard every three to six months. But some conditions might need more frequent care.
You might need to deep clean your laptop as frequently as once a month if you use it in dusty areas (such as outdoors or construction sites), share it with others, or eat close to it. Key performance can be hampered by the rapid accumulation of dust, crumbs, hair, and skin oils.
A biannual cleaning is typically adequate for users who use an external keyboard or keyboard cover and maintain a tidy workspace.
Always do a quick surface wipe once a week in addition to your scheduled cleanings, and think about doing a deeper clean whenever you see sticky keys, odd key behavior, or obvious debris.
Frequent maintenance prolongs the life of your laptop, enhances hygiene, and keeps it looking nice.
VIII. Final Checklist for Safe Cleaning
Use this checklist to make sure everything is completed safely and successfully before concluding your laptop keyboard deep cleaning session:
✅ Fully Power Down: To prevent electrical hazards, always turn off your laptop and unplug it from any power source.
✅ Take Out External Devices: Unplug all peripherals, charging cables, and USB drives.
✅ Use the Correct Tools: Make sure you’re using non-metallic tools such as cotton swabs, a microfiber cloth, compressed air, and a soft-bristle brush.
✅ Steer clear of liquid contact: Never mist the keyboard with cleaning agents. Always start with a wet cloth or swab.
✅ Work in Small Sections: To prevent omissions and guarantee complete cleaning, concentrate on one area at a time.
✅ Check for Loose Keys: Examine the keys for damage or looseness both before and after cleaning.
✅ Completely Dry: Before turning the device back on, let all surfaces air dry.
✅ Storage Materials The right way to store your cleaning supplies for later use is in a dust-free area.
By following this checklist, you can safely maintain keyboard longevity, cleanliness, and performance.
IX. FAQs
Q1: Is it possible to clean my laptop keyboard with alcohol?
Yes, but only in small quantities and with isopropyl alcohol (ideally 70% or more). Never pour or spray alcohol directly onto the keyboard; instead, moisten it with a cotton swab or microfiber cloth.
Q2: Is using a vacuum cleaner on the keyboard safe?
Ordinary household vacuums are not advised. To get rid of debris without destroying components, use compressed air or a handheld vacuum designed for electronics.
Q3: What if, while cleaning, I unintentionally took out a key?
Although most keys can be gently snapped back into place, consult your laptop’s manual or get professional assistance if the key is damaged or doesn’t fit correctly.
Q4: After cleaning, how long should I wait before turning the laptop back on?
Make sure everything is completely dry by waiting for at least half an hour, especially if any damp swabs or cloths were used.
Q5: Do I need any tools to clean my keyboard?
Yes, your hands and a dry microfiber cloth are sufficient for light cleaning. Brushes and compressed air, however, work better for deep cleaning.
X. Call to Action
Maintaining the cleanliness of your laptop keyboard is important for both your personal hygiene and the functionality and longevity of your device. It’s time to act now that you know how to thoroughly clean your laptop keyboard without taking the keys out. Remember to collect the necessary equipment, clean it on a regular basis, and adhere to the above-described safe, methodical procedure.
Share this guide with friends or coworkers who might also benefit from a more streamlined, responsive laptop if you found it useful. Do you want more advice on laptop maintenance? Get weekly updates on how to take care of and optimize your tech equipment by subscribing to our newsletter or bookmarking our blog. A spotless keyboard is only the beginning; together, let’s maintain your entire setup. Make keyboard cleaning a regular part of your tech routine by starting today!